A lot of web based framework from both open source and branded vendors are frequently used in black box fashion for developing web applications. Everything worked perfectly during testing, however in production it intermittently crashed with out of memory error. Most developers would just add "-Xms2048m -Xmx2048m -XX:PermSize=256m -XX:MaxPermSize=256m" and the problem went away until the next crash. Once daily crashes started to occur often enough, the next typical ingenious solution is to restart the web application every day using a scheduler. Sometimes even twice in a day.
There is a better way. It involves looking at memory and thread dump to see what was actually going on under the hood and fix the problem! The steps involved are actually quite simple.
1. Look for java process id. jps -l
2. Do a thread dump. jstack [java process id] > process_thread.dump
3. Do a memory dump. jmap -dump:file=process_memory.hprof [java process id]
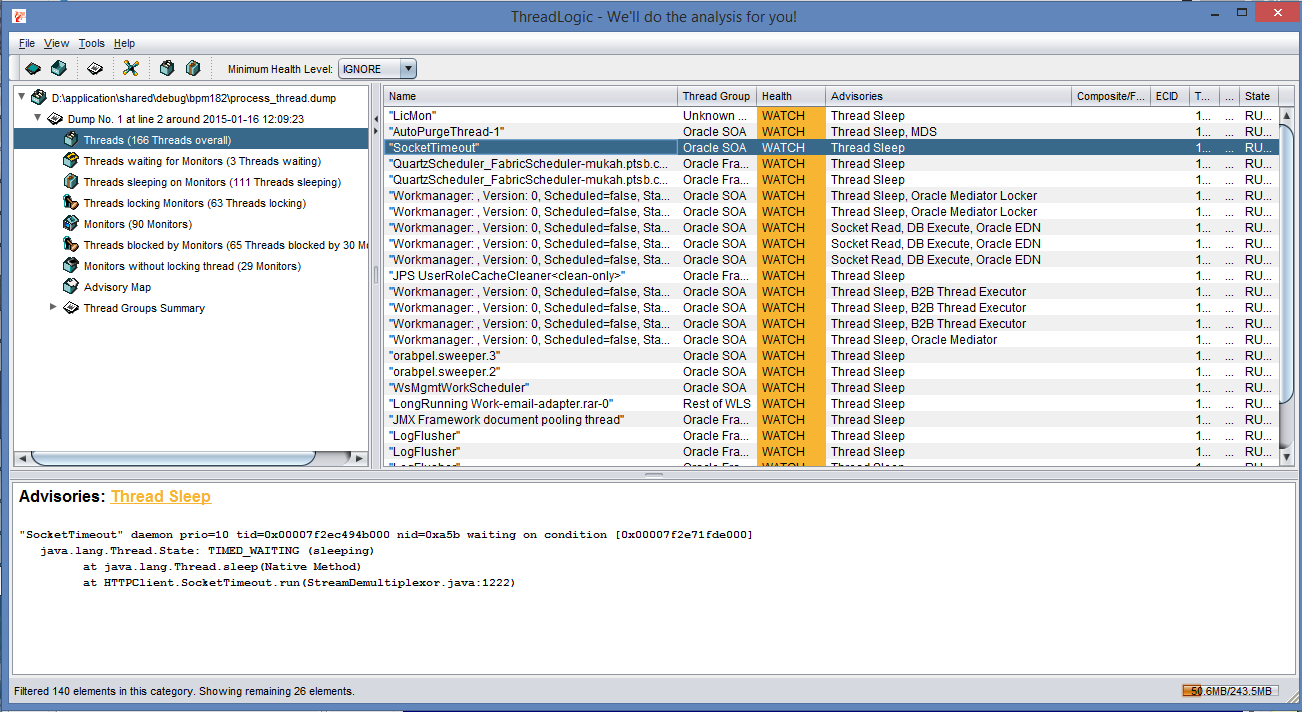
5. Download ThreadLogic from https://java.net/projects/threadlogic. Make sure to compile from the source as the downloaded ThreadLogic-2.0.215.jar from the site does not seem to work. Run it and open process_thread.dump with it.
These tools help tremendously in hunting down the root cause of the dreaded "out of memory" problem at production environment. Best part is that no changes need to be make to the running application. For weblogic server, the Oracle advisory map that comes with ThreadLogic is invaluable as it can quickly be used to zoom in on the potential problem area. Reference: jmap - http://docs.oracle.com/javase/7/docs/technotes/tools/share/jmap.html jstack - http://docs.oracle.com/javase/8/docs/technotes/tools/unix/jstack.html
Play 2 is a very interesting framework as both Java and Scala language can be used interchangeably in the same project for developing web application. Basically, it follows MVC pattern but breaks a couple of in grained java programming practices if one is well versed with Spring and J2EE development framework. For a more in dept analysis of this framework, I've decided to use it to implement a production grade SaaS application. Over the past one year, as new features were added and bugs fixed, the SaaS application was tinkered along the way to keep in line with each release of Play 2 framework. The current development environment is as follows:
Source Code Repository: GIT at bitbucket.org
Repository Manager: Artifactory 3.4.0
JVM: Oracle JDK 1.7
IDE: Eclipse Luna with Scala IDE plugin
Database: Postgresql 9.3
ORM: JPA 2.1 and Hibernate 4.3.6
Security Framework: Social Secure master-snapshot
Scala: 2.11.1
Charting: DS3.js
Template: Bootstrap 3
The features that have been implemented are:
Internationalization
AJAX invocation
Bootstrap 3 based custom components
Segregation of functions into modules
Custom login page and authorization provider for Social Secure
Front end javascript validation
Date and numeric field formatting
Optimized bulk insert and loading of data
The positives:
Building a working CRUD page is much faster than with JSF-Spring-JPA. Scala template is simpler than JSF.
The performance is very good. The generated code is less cluttered when compared to JSF. Much easier to manipulate it through jQuery and unlike JSF do not have to synchronize the state with the server side managed bean.
Much easier to add customized components. Just drop the HTML code in a scala wrapper method.
No need to restart the server when adding the new code.
Auto-binding of the form data.
Akka
The negatives:
Compilation can be slow. 105 scala sources and 87 java sources, take up to 2 minute to compile from a clean state. Much faster on subsequent compilation. Depending on the changes, some still trigger a lot of recompilation.
A lot of jar files are added via the transitive dependency. Currently stands at over 60 jars.
Scala IDE with Eclipse Luna is not working well. Occasionally some jar files could not be cleared until Eclipse is closed. Turning on "Build Automatically" can cause problem when compiling using the command line, activator compile.
Pentaho is just awesome. The fact that it is open source make it really useful for SME that do not have a massive budget. Although its UI may not be flashy and polished, it comes with a suite of powerful tools that can get the job done really well. During recent work on mining data from various database, Oracle 12c seems to be the most problematic to get it working. After experimenting with various configuration, finally got them to talk using JNDI setup.
1. Oracle 12c Configuration
On the Oracle 12c server, the tnsname is configured as follows:
2. Installing Oracle JDBC Driver in Pentaho
Copy the Oracle JDBC driver,ojdbc7.jar from
<ORACLE_INSTALLATION_PATH>/product/12.1.0/dbhome_1/jdbc/lib/
to <PENTAHO_INSTALLATION_PATH>/lib/
Note: Copy the ojdbc6.jar instead if using JDK 1.6
3. Pentaho DI 5.2 - Spoon Configuration
Locate jdbc.properties file at data_integration/simple_jndi folder. After adding the configuration for Oracle 12c, it becomes as follows:
* PdbJupiter - JNDI name * pdbjupiter - PDB database * biadm - A normal user created for PDB
Launch Spoon, go to Tools -> Repository -> Explore -> Connections and add the connection to Oracle 12c as shown in the screen below.
Spoon should now be able to extract and load data from Oracle 12c.
Note: For Oracle 12c, the database url connection has been changed from jdbc:oracle:thin:@192.168.56.11:1521:<SID>
to jdbc:oracle:thin:@192.168.56.11:1521/<SERVICE NAME>
Hence, using Native(JDBC) method to connect to Oracle 12c database is not working as it only regconise the first format.
It may appear quite obvious that any Spring based web application that works under Tomcat should be working when deployed to JBoss EAP 5.1. In fact, this is further than the truth. Most often than not, the Spring based web application would just spew out tones of exception messages. This is exactly what happened when I tried to deploy a Spring 3.0.5/Hibernate 3.5.6 web application to JBoss EAP 5.1. I did finally get the application to work but not after spending many hours of trial and error to figure out the exceptions. Here are my eventual fixes.
1. Removed all the XML parsers under WEB-INF/lib directory, i.e. xmlParsers, xml-api, xalan, xerces.
2. Added hibernate-validator-4.1.0.Final.jar to WEB-INF/lib directory. For some unknown reason, JBoss EAP 5.1 absolutely need this.
3. Add 2 entries to hibernate.properties to pass into Spring. See text in red below.
With these changes, the web application finally works.
Jenkins(or Hudson) and Sonar are perhaps two of the most mature open source tools available today for implementing continuous integration. They comes with a plethora of features that make life easier at monitoring and managing quality of multiple software development projects. Out of the box, Sonar is designed for Maven project. However, it can be configured to work with Ant projects. The following steps show you how to achieve this:
Installation
1. Download this plugin Sonar Ant Jar
2. Copy the jar file into <ANT_HOME>/lib
This is very important, otherwise your project would not compile properly.
Configuration
Ant projects typically come with <PROJECT>.properties and <PROJECT>.xml files. So, just add the following code snippets into the existing ant build file. The code snippets assume that Sonar has already been installed to run at http://localhost:8080/sonar with Postgresql database.
Running
From the command prompt or inside your favourite IDE, run "ant -f myproject.xml sonar". This will take awhile depending on your project size. Once completed, myproject should show up on the project list inside Sonar.
Integrating with Jenkins/Hudson
Under "configure" panel, just add a new ant task to execute the "sonar" task.
Reference: 1. For more details on Ant Task, seeAnalyse with Ant Task 2. For more details on Jenkins, see Jenkins 3. For more details on Sonar, seeSonar